
Are you finally migrating your business site to HTTPS?
Then you are like me … You are a procrastinator.
It’s been nearly a year since all non-https sites in Google Chrome started showing up as “Not secure.”
This warning shows for all HTTP websites, whether or not they have have forms, login fields and other input sections. As such, it’s kind of silly. But Google-mandated best practices can’t be ignored in my business, so I figured I’d get at least one of my sites taken care of today.
Here’s how it went.

What is HTTPS?
HTTPS (Hyper Text Transfer Protocol Secure) appears in the URL when a website is secured by an SSL “certificate.” The certificate is specific to the URL or IP address for that server, and its presence on the machine enables the trust mechanisms and encryption that come with an SSL session.
SSL stands for Secure Sockets Layer. It’s the standard technology for keeping an online connection secure, safeguarding data sent between two systems. The details of the certificate, including the issuing authority and the corporate name of the website owner, can be viewed by clicking on the lock symbol on the browser bar. In the image above, there is no lock. Instead it says “not secure.” That’s the problem!
SSL is meant to stop third parties from reading and modifying information that you transfer to someone online, including potential personal details. The two “safe” systems can be a server and a client (for example, a shopping website and browser) or server to server (for example, an application with personal identifiable information or with payroll information).
Is HTTPS Important for My Business Website?
What effect will an SSL certificate have on how your business site appears in search results? Apparently there is no effect—at least directly. John Mueller from Google said “there’s no ranking boost for using any particular kind of certificate ( DV, OV, or EV). Use whatever works for you. Use a free one if you want.”
HOWEVER … Sitewide HTTPS should deliver speed increases, as the certificate which secures the transfer of data also enables a speed-enhancing protocol called HTTP/2.0 (if you make sure your dev/webmaster enables it).
(For information on implementing HTTP/2.0 on a Cpanel server with Namehero hosting, watch this video):
How Do I Get HTTPS?
In my quest to secure my site, the first thing I did was check out the offerings over at my host, Knownhost.
$30/year was the best option they offer.
After doing some additional research, I learned that the expensive SSL certificates don’t have any advantage over the free ones. Furthermore, Let’s Encrypt came highly recommended, so I looked into what it would take to get it going.
Unfortunately, I saw KnownHost on the list of hosts that don’t support Let’s Encrypt, so I contacted their excellent customer support and got an answer in about two minutes (did I mention their excellent customer support)?
Apparently the list was wrong. cPanel (the web based control panel where I manage my sites) has had a feature called AutoSSL to automatically install Domain-Validated (DV) SSL certificates. AutoSSL supports both Let’s Encrypt certificates and certificates issued by cPanel’s certificate authority (powered by Comodo … which is now called Sectigo, as if this weren’t already confusing enough).
In other words, you can use one of two different signers with the AutoSSL system. By default theAutoSSL system uses Comodo/Sectigo as the signer, but if you prefer, it can be set to LetsEncrypt. Both offer free DV SSLs.
I could see that both my domains were already using the AutoSSL system: I checked Why No Padlock and saw my webserver wasn’t “forcing the use of SSL.” Adding a redirect “to ensure a secure connection is used” was recommended.
What does this mean?
Basically, Why No Padlock suggested I add the following code to the .htaccess file in my webhosting account:
RewriteEngine On
RewriteCond %{HTTP_HOST} theaustineditor\.com [NC]
RewriteCond %{SERVER_PORT} 80
RewriteRule ^(.*)$ https://theaustineditor.com/$1 [R,L]
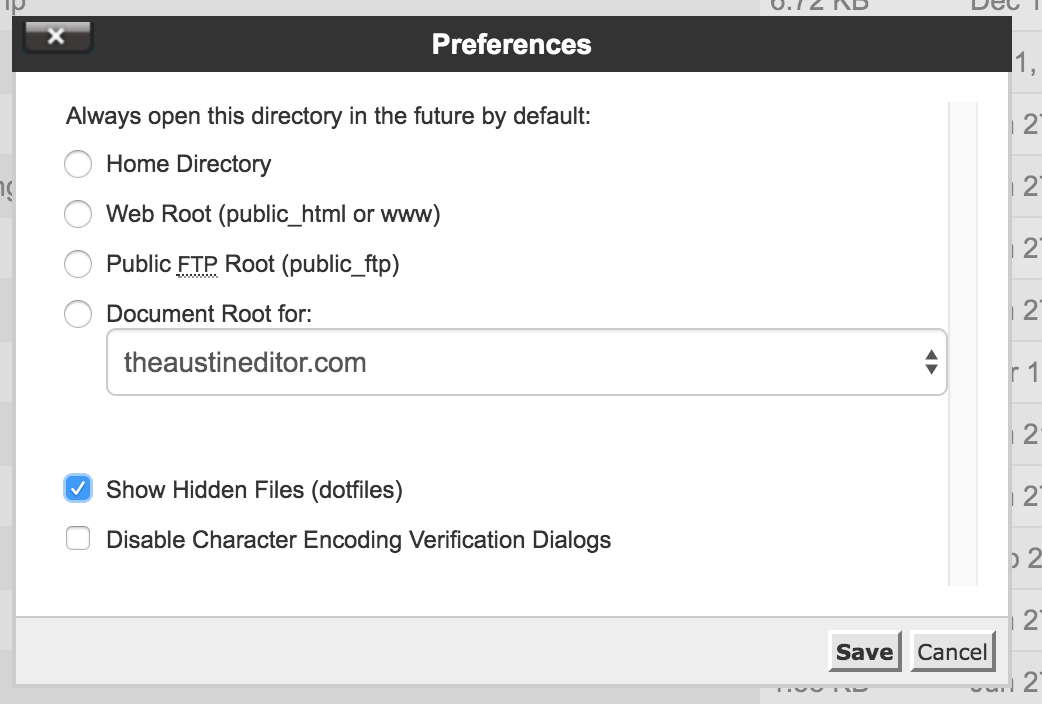
There was no sign of the .htaccess file, so I had to go to cPanel “settings” and show hidden files:
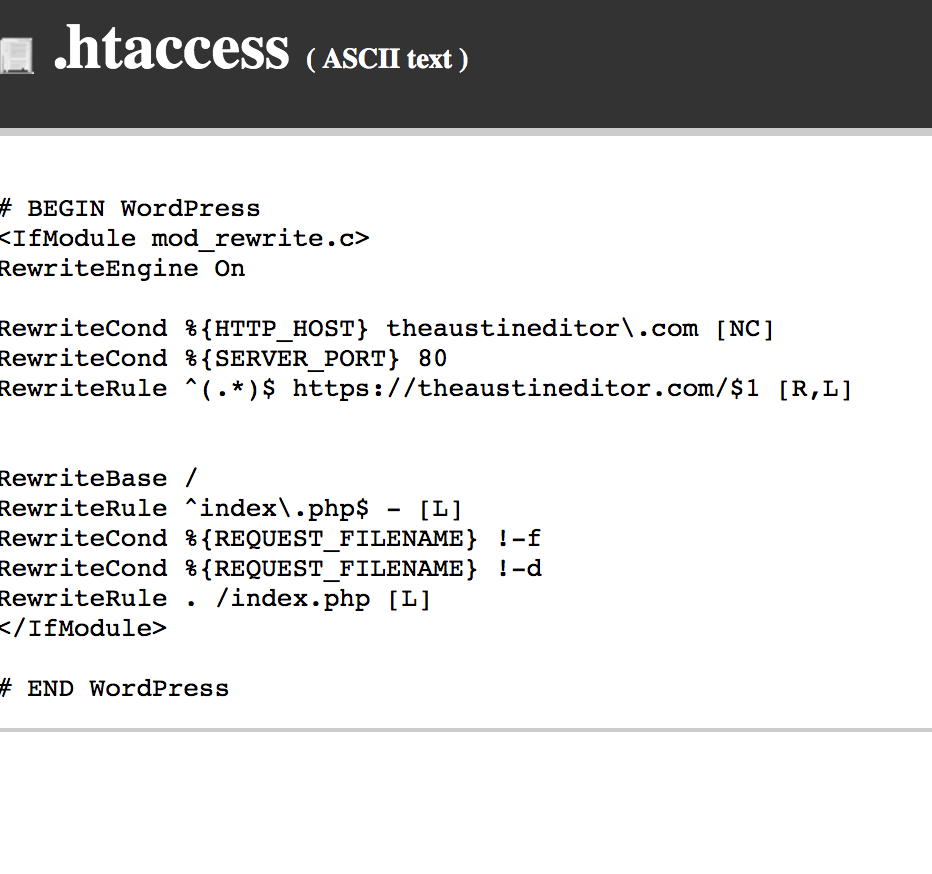
While I was bumbling around online trying to find out exactly WHERE in the .htaccess this snippet belongs, I came across this nugget:
If you have some existing code in your .htaccess, make sure that RewriteEngine On is not repeated twice. In case the line already exists, simply copy the rest of the code without it.
Sure would be nice if all these CRITICALLY IMPORTANT THINGS were, you know, IN ONE PLACE, right?
Anyway, here’s what I ended up with:
This “Tips for Tips for .htaccess” page has additional, possibly conflicting information. Skip down to the “Force SSL (https) with or without WWW” section.
Checking That It Worked
For Austin Editor, everything seems to have worked until I look at the sitemap. You’ll see it links to “HTTP” versions (each of them is a broken link.

I’m still not sure how to make old links “https” without manually changing them. Apparently this goes for Yoast-generated sitemaps, as well. This is bad news for anyone who’s been running an HTTP site for years. (if anyone has any tips on how to automatically update all sitewide links to the new HTTPS version, I’m all ears).
Migrating Our Business Site to HTTPS
For Amurica TX (my wife’s wedding photobooth here in Austin), we had a hard time getting rid of the “WWW” in the url. There was a lot of “All In One” security stuff in the .htaccess file. (remember, folks: when you add WordPress plugins, they alter your site’s most important files!), so I tried disabling plugins that I thought might be causing the problem. Here are some other things I tried:
- I set our Default URL in the Basic Settings section (under “Admin”) in Google Analytics.
- I set our Preferred Version in Google Search Console.
- I disabled all plugins that change the .htaccess file to make sure none of them were interfering with its functionality.
- I added the following to my .htaccess file, making sure “RewriteEngine On” appears only one time in the file (again … previously-used plugins can mess up this file and you may find “RewriteEngine On” twice or more).
RewriteEngine On
RewriteCond %{HTTP_HOST} exampledomain\.com [NC]
RewriteCond %{SERVER_PORT} 80
RewriteRule ^(.*)$ https://exampledomain.com/$1 [R,L]
When none of this worked, I also added this to my .htaccess file:
#Comment | Force all URLs to https WITHOUT www
#RewriteCond %{SERVER_PORT} 80
#RewriteRule ^(.*)$ https://example.com/$1 [R,L]
Still, my site keeps resolving to the WWW version. So, as I often do when stumped, I took my question to Reddit. As it turns out, I simply needed to adjust the basic/general settings in WordPress.
So that was s a basic oversight on my part. Still, I’m not sure if I’m retaining my old Google Analytics info now that I’ve made the switch from http://amuricatx.com to https://amuricatx.com. But we should be able to check once a few weeks have passed.
My Why No Padlock test came back good, although a few “Mixed Content – Errors” were identified (essentially a few images that still have “http” at the start of the file path), so I’ll go check direct links to make sure they point to “https” instead of “http.”
I followed David’s comment on this page, copied below, but NONE OF THIS WORKED FOR ME. I’m not trying to give bad information a broader platform; I’m simply hoping someone can troubleshoot this directive and show me (austineditor@gmail.com) where things went wrong.
Log into your cPanel for your hosting and go to PhpMyAdmin. Click on the database for your site and go to the wp_options table [note: this wasn’t called this in my database, but it had “_options” at the end so could find it]. The top two table options will show your URL. Click on the edit link and make sure that the URL has the HTTPS:// appended to the beginning. Now log back into your WordPress site and go to Settings > Permalinks and click the save button two times.
I changed those two options to make the URLs “https,” but Whynopadlock is still showing the “Mixed Content” errors.
HTTPS and SEO
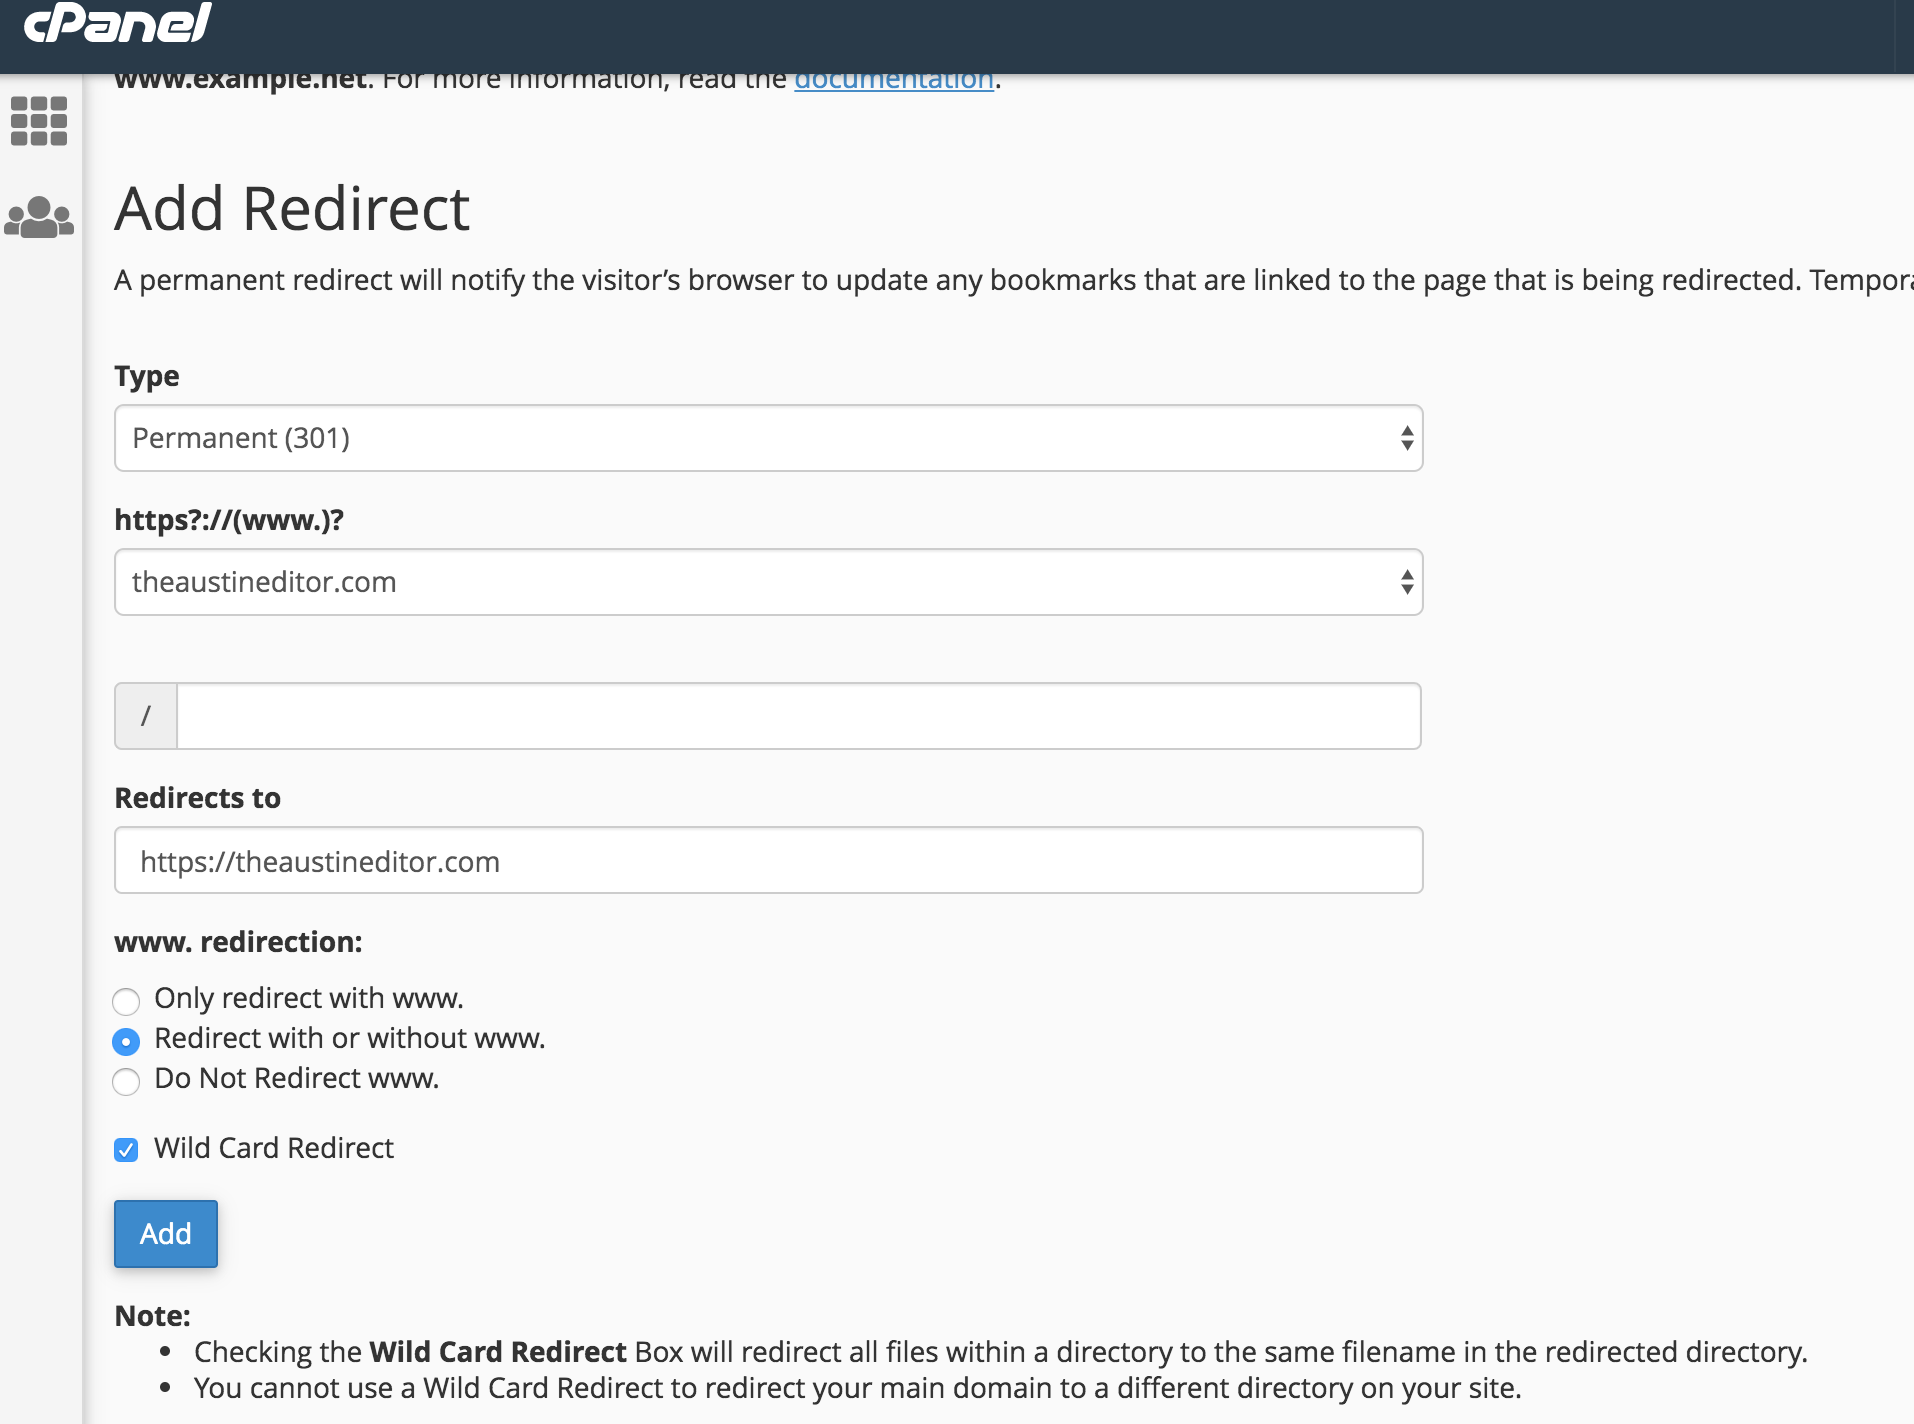
Don’t Forget Redirects!
To force your visitors to use your Shared SSL certificate, log into your cPanel and access the redirects section. Set “Type” to “Permanent (301).” Next to “redirects to,” enter your website’s URL using the Shared SSL Certificate.
Select “Redirect with or without www” and ensure Wild Card Redirect is selected to redirect all of the files in a directory to the same filename in the redirected directory.
Click Add.
Google Analytics After Migrating to HTTPS
Final Note:
When your site is on HTTPS and you are linking or redirecting to a HTTP site, the browser will not send a referrer. This hold true with both sites are HTTPS, but the ahref destination is indicated as HTTP.
That means referral traffic will appear as direct when the referral is coming from HTTPS to HTTP. Because the link is hitting the HTTP first, it is negotiating its initial connection over an unsecure channel. The incoming connection is initiated over HTTP before it is able to detect and process the redirect, so the referrer is stripped.
What does this mean?
If you have an HTTP site with lots of links from some of your pages to other pages on your site, then you migrate to HTTPS, it’s important to change those links. Sure, they’ll work (if redirection was set up properly), but if you want your analytics data to be as accurate as possible, you should change it.
Sources:
Check out the Pickaweb infographic on how to go about all of this. The image doesn’t load a readable size when you click it, but if you open it in a new tab you’ll be able to see it.
Also, Search Engine Watch has a good guide.
Also:
https://forums.cpanel.net/threads/tips-for-htaccess.581461/#post-2365782